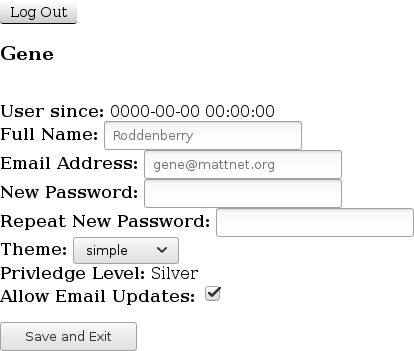
 The button to reach the screen where you can change the details of your account is located on the first screen after logging in. You hit the button marked "Adjust Account".
 This takes you to the screen where you can change your email address, your name, assign a new password, change your theme, or allow the software to send you notifications. We ask that you use your regular name (vice using a username) in the "Full Name" field. This name is used only for administration, and is not given to the other players during the normal course of the game. When finished, hit the "Save and Exit" button to take you back to the entry screen.
Changing the "theme" will change the environment shown while you are logged into the software. It changes the background image, changes the color of some or all of the text, and changes the appearance of some of the buttons. Some of those themes have very interesting artwork, and each should help to get into the mood of the games you are playing in.
The "Privledge Level" is an indicator of what level of trust the software adminsitrators have in you. A very basic level allows players to just play games and then only to participate at a low level. The next higher level of privledges allows the player to play as any empire. Further levels allow players to create their own games, or even to adjust games or accounts that aren't their own.
By allowing "Email Updates", you allow the software to send you a notification (to the email listed further up the screen) whenever a turn is advanced inside a game you are participating in.

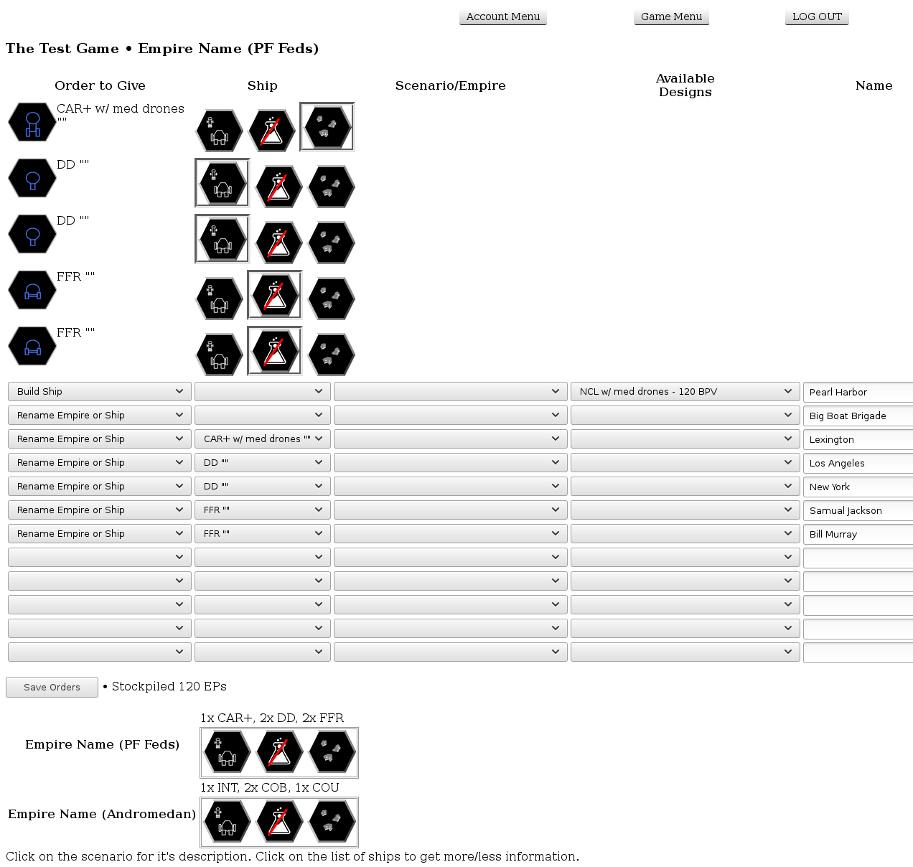
Click on the "Assign Orders" button to reach the screen where orders are given. On a new turn, this shows a series of unassigned drop-down menus. The column header describes what the drop-down menus are used for (What order to give, what ship to issue the order to, what scenario or empire to select for the order, what available design to use, or what name to give.)
Click on the "Save Orders" button to save the orders you have selected. This will save the current set of orders with the server and return you to this same screen with some new blank rows, so you can enter more orders (if needed). This has the advantage that the server has had a chance to inspect your orders and show you what it thinks you meant. It is important that you hit the "Save Orders" button before you leave the page, for the server will not see any orders you have recently put in unless it is showing you the standard amount of blank lines (those last five blank lines, in the case of the following image.) The image to the left shows what a set of first-turn orders might look like.
The top section of the orders screen is a series of icons. The first column of icons represent each of your ships (you can mouse-over the icon to get a name of the ship, or the name of the scenario in the case of the other icons.) The remaining icons in this section represent the scenarios that your empire has. Click on the scenario icon for each given row, and the ship at the head of the row will be assigned to that scenario. Additionally, the scenario that the ship will visit, will have a box (of a style designated by your chosen theme) around it. If your display is sufficiently small (e.g. a phone or some tablets), then the graphical method of assigning ships will be replaced with drop-down menus in the same style as the following orders.
The first column is the most important, and every order given needs to have this drop-down set to the type of order you wish to give. These orders might be to rename something, mark one of your ships destroyed during a scenario, or to designate the defender of a scenario as successful or unsuccessful. The remaining drop-downs provide details to the order selected in the first column. Any drop-downs selected that don't factor into the context of the order will be ignored.
The second column selects which of your ships to use in the order. This is used to select which ship to bid to a scenario, which of your ships were crippled or destroyed in a scenario, or which ship to convert, refit, or repair. Note that, per the campaign rules, ships which are sent back for repair, conversion, or refit, cannot be bid to a scenario. Attempts to bid a ship that is also being sent back for work will fail (the refit, et.al. will be successful, but the bid will be unsuccessful.)
The third column is used to select the scenario or empire to use for the order. This drop-down is used in those orders where you want to bid a ship (to that scenario), mark a defender as defeated in the selected scenario, mark a defender as victorious in the selected scenario, or to gift your ship to the selected empire (that gifting might have been done at gunpoint. e.g. the ship was captured during the scenario.)
The fourth column of drop-downs select which design of ship to use. This column is used when selected what ship to build or what ship to refit/convert to. The software does not (at this time) attempt to restrict certain ship designs to be refit or converted to certain other ship designs. A player attempting to cheat, may elect to "convert" their frigates to dreadnaughts. We expect that a player's sense of fair play and the alertness of the other players will keep everyone honest. If you want to be dishonest, note that an administrator needs only two mouse-clicks to remove you from the game.
The fifth and final column of orders are text-entries. This is used when building ships (to name the newly-built unit), when renaming ships (e.g. when a column-two unit is selected), or when renaiming your empire (when the second column is empty).
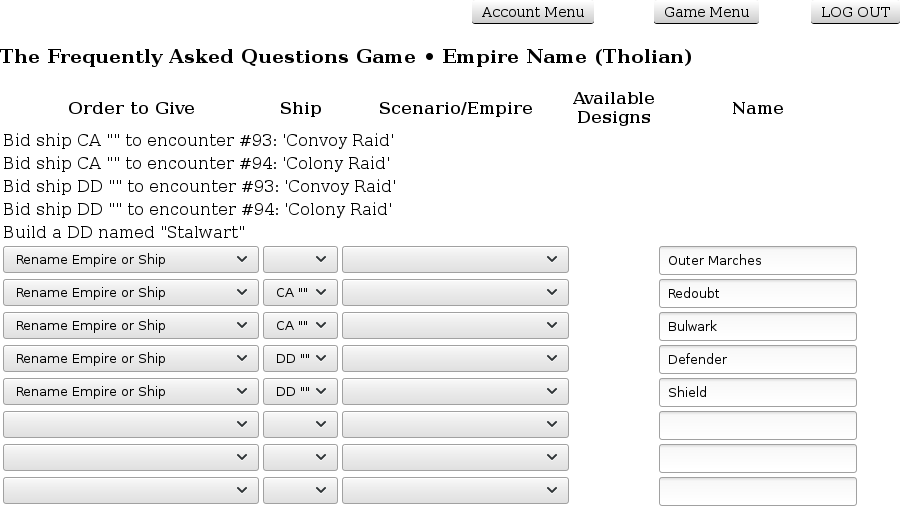
 After bidding has finished and the moderator has advanced the turn to the point where everyone needs to resolve their encounters, the orders page changes. Those orders which can only be done at the start of the turn are greyed out in the drop-downs and those that have been given are shown in a more permenant state. This is the point in the turn where each player tells the software which ships were destroyed, crippled, "gifted-by-gunpoint" to others, and who was victorious in each scenario. The software will attempt to auto-order those scenarios that were not in doubt as to who succeeded.
Each player gives the needed orders (it's possible that nothing needs to be done). It is still important to hit the "Ready to Advance button" once your orders here are complete (or nothing needs to be done by you.)
 The button to reach the screen where you can change the details of your account is located on the first screen after logging in. You hit the button marked "Adjust Account".
 This takes you to the screen where you can change your email address, your name, assign a new password, change your theme, or allow the software to send you notifications. We ask that you use your regular name (vice using a username) in the "Full Name" field. This name is used only for administration, and is not given to the other players during the normal course of the game. When finished, hit the "Save and Exit" button to take you back to the entry screen.


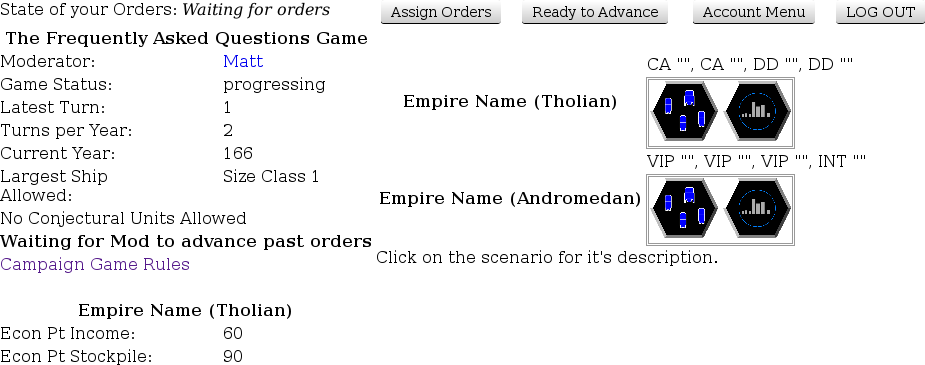
 After your orders are completed, click on the "Game Menu" button at the top of the screen. This will take you back to an overview of the game. It is important at this point, to click on the "Ready to Advance" button. This will change your status from "Please wait for me to finish my orders" to "I'm ready to go on with the game." The game will tell you to the left of those buttons that your state has changed from "Waiting for Orders" to "Ready to advance the turn." The moderator of the game will see that you say your orders are done, and can advance the game when everyone has done this. The image to the right shows which button to press and where that status change is shown.
 After bidding has finished and the moderator has advanced the turn to the point where everyone needs to resolve their encounters, the orders page changes. Those orders which can only be done at the start of the turn are greyed out in the drop-downs and those that have been given are shown in a more permenant state. This is the point in the turn where each player tells the software which ships were destroyed, crippled, "gifted-by-gunpoint" to others, and who was victorious in each scenario. The software will attempt to auto-order those scenarios that were not in doubt as to who succeeded.